
Tuesday, September 28, 2010
Guest Post on Designed to the Nines
So I met this girl, NataLee at the fabric store the other day and we started talking while the computers were down. She had lots of cute fabric in her cart. So we exchanged cards, she's a designer. I came home and looked at her blog, uh HELLO she was on Design Star season 4 in LA. Anyhow, she emailed me and wanted me to do a guest post on her blog. So click on the following link http://designedtothenines.com/ to check it out.
Friday, September 24, 2010
Roxanne's house
So Roxanne is one of my repeat clients. Every year or so she calls me with a new project. I slipcovered the items for the office about a year ago, but I never got to see it all put together because they were still painting, so I left everything in bags in her garage. So this year when I finished the front room chairs and ottoman, I brought my camera.
One of my designer clients Katrina, helped Roxanne with her office and front room. I was blown away by how it all came together. I have worked with Katrina many times on some of her other jobs, and she always does a fabulous job. If you are local to SLC, UT and need some design help in decorating your home give her a call. You can email me at heberj1@yahoo.com for her phone #. She is great at finding things on a bargain, and fixing things up.
OFFICE
 Here is a shot of the desk and office chair. I know the desk was a oak desk that she got off KSL.com and painted. The chair is your regular office chair on wheel from Office Max. I wasn't sure how the office chair thing was going to work out, and was really hesitant loading it into my trailer. It turned out great. The fabric is a pinstripe seersucker. I didn't readjust any of these slipcovers before I took pics, I was impressed with how in place they still were after a year.
 close up of office chair...it's turquoise/tan/cream pinstripe seersucker fabric.
 Here is a shot of the office after all the slipcovers were put back on. The turquoise chair is a beautiful hot pink velvet underneath, and the couch is a great 90's floral underneath. She used a white cotton canvas on the couch. Both pieces were picked up second hand. On the couch were some yummy tan cable sweater looking pillows. I believe both fabrics were $3.99/ yd at Home Fabrics.
 Another shot of the office after, this office is actually in her basement! I couldn't believe the light, the mirrored french doors made the room for me. It was so peaceful in there.
THE FOLLOWING PICTURES ARE FROM THE FRONT ROOM
 Front room Before... all the items were picked up from goodwill.
 Front room After...cream canvas was used to slipcover the chairs and a green/turquoise stripe was used to slipcover the ottoman. The couch I slipcovered about 4 years ago, and she was still able to incorporate it into her new house.
 Both chairs slipcovered...they are different shapes, but with the same fabric most people wouldn't notice they were different.
 Close up of the white chair, showing the piping detail on the inside arm.
 Close up of ottoman, the flash didn't do this fabric justice. It's a green/turqoise pinstripe.
 A shot of the whole front room.


One of my designer clients Katrina, helped Roxanne with her office and front room. I was blown away by how it all came together. I have worked with Katrina many times on some of her other jobs, and she always does a fabulous job. If you are local to SLC, UT and need some design help in decorating your home give her a call. You can email me at heberj1@yahoo.com for her phone #. She is great at finding things on a bargain, and fixing things up.
OFFICE

THE FOLLOWING PICTURES ARE FROM THE FRONT ROOM


Thursday, September 16, 2010
"How to Slipcover" DVD is done!!!!
So I finally got to pick up my finished DVD's today!! I am so pleased with how they turned out. If you were on my waitlist, you should have received a paypal invoice. If not click below and purchase.
Once you pay via paypal, the dvd will be shipped within 24 hours and I will then email you my list of sources for linen, down cushions, piping, zippers, etc.
My first batched shipped today! So for those who have paid, you should be getting your DVD next week sometime.

My "How to Slipcover Video" walks you through the basics of slipcovering and will give you the skills to slipcover just about anything. I teach you to make a slipcover by pinning it on inside out. I was self taught and learned through trial and error over the past 11 years... with the DVD you can learn without going through the heartache and wasted time that I went through. I am now fast at what I do, and with practice you can be too.The DVD is $45 dollars plus $3 dollars shipping. Click below to purchase.
Ok...I just heard people are having problems with the button below, if you are going to use the button you need to have my email address handy (heberj1@yahoo.com). Or you can simply go to http://www.paypal.com/ and click on the button that says "send money" and enter my email address heberj1@yahoo.com and enter $48 as the amount.
Wednesday, September 15, 2010
My front room
So the other day, when my kids started school I decided to scrape all the junk off the kitchen floor and mop and wash my slipcovers. My three boys make things pretty gross. Anyhow I realized I have never posted what my furniture looks like underneath my slipcovers. SO here it is.
Here is a photo of my room without slipcovers. My nice peach velvet tufted couch I picked up for $13 from Savers (local thrift store). My nice green loveseat is from a yardsale for $20. They two toile arm chairs I picked up from DI (local thrift store) for $10 each and had to have the springs fixed and the legs reglued. My upholsterer told me I might as well reupholster them...it would be the same price. So I hurried to the fabric store and chose this black and white toile. I still wanted to slipcover the chairs to protect them from my little ones.
Here is a close up of the couch. I really love the tufting and while the slipcovers were washing I was trying to figure out some color scheme that would make the peach color look "cool". Then I gave up because I was remembering my childhood bedroom that my mother decorated in peach and light green. I think I'll stick to the tan slipcover.
This loveseat's fabric is really slick and when you'd sit on the slipcovered loveseat the slipcover would pull and shift way more than normal, so I sewed some velcro onto the seam allowance of the top inside back. Then I staple gunned the other side of velcro to the loveseat itself, now it stays in place perfectly. I love the arms on this piece.
I got tired of the slipcover sticking to the velvet and pulling weird, so I made this underslip out of scraps of muslin.
The couch and loveseat are slipcovered in a tan cotton fabric. The chairs are out of white duck cloth. I always like to finish a room off with pillows, so I used some white pottery barn linen napkins to back most of the pillows and pieced the ones on the chairs out of scraps.
I ended up replacing all the cushions with down. The couch and loveseat are down envelopes with a foam core (extra support). The chairs are solid down with no foam.
I did gathered skirts on the couch and loveseat...they are completly different shapes but with the same fabric and skirts they look like a set.
I decided to do a short kick pleat skirt on the chairs and let the legs show.
IF you are interested in learning to make slipcovers yourself click on the button (HOW TO SLIPCOVER DVD)to purchase.


 |
| Front room before |
Here is a photo of my room without slipcovers. My nice peach velvet tufted couch I picked up for $13 from Savers (local thrift store). My nice green loveseat is from a yardsale for $20. They two toile arm chairs I picked up from DI (local thrift store) for $10 each and had to have the springs fixed and the legs reglued. My upholsterer told me I might as well reupholster them...it would be the same price. So I hurried to the fabric store and chose this black and white toile. I still wanted to slipcover the chairs to protect them from my little ones.
 |
| couch before |
Here is a close up of the couch. I really love the tufting and while the slipcovers were washing I was trying to figure out some color scheme that would make the peach color look "cool". Then I gave up because I was remembering my childhood bedroom that my mother decorated in peach and light green. I think I'll stick to the tan slipcover.
 |
| loveseat before |
This loveseat's fabric is really slick and when you'd sit on the slipcovered loveseat the slipcover would pull and shift way more than normal, so I sewed some velcro onto the seam allowance of the top inside back. Then I staple gunned the other side of velcro to the loveseat itself, now it stays in place perfectly. I love the arms on this piece.
 |
| velcro on outside back of loveseat |
 |
| Muslin slip for couch to keep the velvet from sticking and pulling the slipcover funny |
I got tired of the slipcover sticking to the velvet and pulling weird, so I made this underslip out of scraps of muslin.
 |
| Front room after |
The couch and loveseat are slipcovered in a tan cotton fabric. The chairs are out of white duck cloth. I always like to finish a room off with pillows, so I used some white pottery barn linen napkins to back most of the pillows and pieced the ones on the chairs out of scraps.
 |
| couch after |
I ended up replacing all the cushions with down. The couch and loveseat are down envelopes with a foam core (extra support). The chairs are solid down with no foam.
 |
| Loveseat after |
I did gathered skirts on the couch and loveseat...they are completly different shapes but with the same fabric and skirts they look like a set.
 |
| chairs after |
I decided to do a short kick pleat skirt on the chairs and let the legs show.
IF you are interested in learning to make slipcovers yourself click on the button (HOW TO SLIPCOVER DVD)to purchase.
Sunday, September 12, 2010
Water at the Cabin
So I haven't posted about the cabin lately, because summer was crazy with lots of trips and we didn't have as much time up there as I thought we would to do projects. Last month Heber tore his ACL playing soccer, so my hopes and dreams of projects at the cabin were not going to come true.
When we bought our little "fixer upper" the water wasn't working and we had no idea why and couldn't figure it out while we were under contract because it snowed too much and we couldn't dig down and fiqure out what the problem was. SO...we went ahead and closed on the cabin in December and hoped we could figure out the problem in the spring. Well the snow didn't melt until June! Then we had trips to the beach and races to run, plus Heber decided it was over his head and didn't think he could figure it out.
I still had my hopes up in July that we could get the water on....all winter we had been hauling our own water up and having the boys pee out back. Then in the middle of July Heber tore his ACL, so then I knew for sure it wasn't going to happen. So then I called a local plumber and he had it on and fixed in a day and a half!!! With a hefty bill of $2,100 I couldn't have been happier. Sometimes it's just worth it!
Heber and a few of his buddies made it up to the cabin to do some "man work". They managed to drop in the cast iron kitchen sink that I picked up used off ksl.com for $45 and install the new faucet that I got for $50 off ksl.com as well.
So in the bathroom they did some "man work" as well. In one day they managed to put a hole in the bathroom sink that I was planning on keeping and broke the brand new toilet Heber had just installed the week before. They went and picked out a tiny new vanity sink at Home Depot before they told me about it. It actually will work alot better with storage. I was just trying to use what we had and not completely gut the place.
This happened 5 minutes before they were going to leave. I had someone that was going to stay at the cabin that night, so they had to run back into town and buy a new toilet and install it before they left. Oh did I mention all this "man work" happened about 7 days post knee surgery. Jared had to carry Heber up the 26 stairs to the cabin.
Heber is really tired of all the paneling work...so each time we go up, he installs one piece of beadboard in the bathroom. I am trying to be patient. I just want the bathroom finished!!! But at least it's functional now...the sink, shower and toilet all work!
So I chose this fabric for the shower curtain...it's turqouise and cream. I can't wait to make it and get it up there with the dark wood floors, beadboard walls, and silver chandelier over the sink. I can totally envision it already. I just need all the beadboard up so I can paint.
When we bought our little "fixer upper" the water wasn't working and we had no idea why and couldn't figure it out while we were under contract because it snowed too much and we couldn't dig down and fiqure out what the problem was. SO...we went ahead and closed on the cabin in December and hoped we could figure out the problem in the spring. Well the snow didn't melt until June! Then we had trips to the beach and races to run, plus Heber decided it was over his head and didn't think he could figure it out.
I still had my hopes up in July that we could get the water on....all winter we had been hauling our own water up and having the boys pee out back. Then in the middle of July Heber tore his ACL, so then I knew for sure it wasn't going to happen. So then I called a local plumber and he had it on and fixed in a day and a half!!! With a hefty bill of $2,100 I couldn't have been happier. Sometimes it's just worth it!
 |
| kitchen sink |
Heber and a few of his buddies made it up to the cabin to do some "man work". They managed to drop in the cast iron kitchen sink that I picked up used off ksl.com for $45 and install the new faucet that I got for $50 off ksl.com as well.
 |
| bathroom sink that got broken |
So in the bathroom they did some "man work" as well. In one day they managed to put a hole in the bathroom sink that I was planning on keeping and broke the brand new toilet Heber had just installed the week before. They went and picked out a tiny new vanity sink at Home Depot before they told me about it. It actually will work alot better with storage. I was just trying to use what we had and not completely gut the place.
 |
| my new toilet that got broken (don't tighten the bolts too much it'll crack the tank) |
This happened 5 minutes before they were going to leave. I had someone that was going to stay at the cabin that night, so they had to run back into town and buy a new toilet and install it before they left. Oh did I mention all this "man work" happened about 7 days post knee surgery. Jared had to carry Heber up the 26 stairs to the cabin.
 |
| beadboard in the bathroom |
Heber is really tired of all the paneling work...so each time we go up, he installs one piece of beadboard in the bathroom. I am trying to be patient. I just want the bathroom finished!!! But at least it's functional now...the sink, shower and toilet all work!
 |
| shower curtain fabric |
So I chose this fabric for the shower curtain...it's turqouise and cream. I can't wait to make it and get it up there with the dark wood floors, beadboard walls, and silver chandelier over the sink. I can totally envision it already. I just need all the beadboard up so I can paint.
 |
sofa table in family room So my neighbor Holly gave me this sofa table that I had in the dining room under the window, which I had to move because of the new ottoman/bench thing that I put there instead. So I thought I would have to give the table back because I had no more spots to put it. Then I brought my friend Heather up to show her the cabin while she was in town, and she spotted the table and suggested we put it behind the yellow chair in the family room. It works perfect, because I didn't have any end tables in there to set anything on. |
Thursday, September 2, 2010
Camille's Front Room
So Camille is my running partner, and she needed help with her front room. So when I went to Reno this summer I went to the fabric store and found this amazing gray paisley for $6/yd. I was inspired and called her and told her that we should do her front room in yellow and gray.
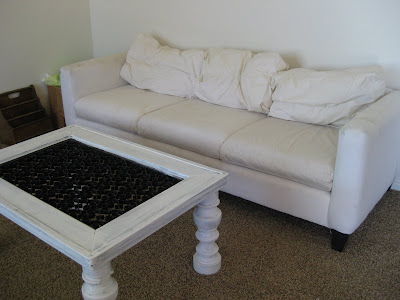
So about a month ago, she came up to the cabin to help me paint the dresser and mirror...and we went to the St. Lawrence thrift store in Heber city, Ut. Her chair was from the free pile out back, and check out the amazing coffee table she picked up for $5 that she painted white.
The couch was from my sister's yard sale for $20, as was the floral fabric for $2, as were the rectangle pillow forms $1/each. The gray rectangle pillow on the couch was fabric from the trash at the Design company that I asked if I could have. It was just big enough to do the front of that pillow.
The light gray fabric on the couch was from the Step Down Sale at the design company for $3/yd. I love the way it all fell into place!! I could sit in there forever.
 Chair Before
 Chair after in the gray paisley
 Close up of the chair
 Couch before
 Couch after in a light gray canvas with no skirt.
 The whole room put together
 Close up of the front of the couch. When I don't put a skirt on I sew a row of piping along the bottom and then topstitch the seam allowance up, so that it doesn't fall out.
 Close up of the pillows
 Chair
Chair
 Camille chilling in her new room!!

So about a month ago, she came up to the cabin to help me paint the dresser and mirror...and we went to the St. Lawrence thrift store in Heber city, Ut. Her chair was from the free pile out back, and check out the amazing coffee table she picked up for $5 that she painted white.
The couch was from my sister's yard sale for $20, as was the floral fabric for $2, as were the rectangle pillow forms $1/each. The gray rectangle pillow on the couch was fabric from the trash at the Design company that I asked if I could have. It was just big enough to do the front of that pillow.
The light gray fabric on the couch was from the Step Down Sale at the design company for $3/yd. I love the way it all fell into place!! I could sit in there forever.
 Chair Before
 Chair after in the gray paisley
 Close up of the chair
 Couch before
 Couch after in a light gray canvas with no skirt.
 The whole room put together
 Close up of the front of the couch. When I don't put a skirt on I sew a row of piping along the bottom and then topstitch the seam allowance up, so that it doesn't fall out.
 Close up of the pillows
 Chair
Chair Camille chilling in her new room!!
Subscribe to:
Posts (Atom)