Saturday, April 28, 2012

Vintage Chenille Bedspread Slipcovers

This client is working on getting ready to have her daughter's wedding reception at her house. She wanted to slipcover two loveseats and a chair and ottoman out of vintage chenille bedspreads that she collected from ebay and antique stores.


Here are the two loveseats BEFORE....she bought the second one the night before I came off craigslist...it was similar in size and shape of her other one.

Chair--- BEFORE

Craigslist loveseat---BEFORE


Loveseat--- AFTER--- She had sticky notes on every bedspread numbering them and letting me know where she wanted them. We bagged them up by item, to try and lessen my confusion when I got started.


Craigslist Loveseat---AFTER--- she wanted to make the two loveseats looks similar, and the chair to be a bit different.


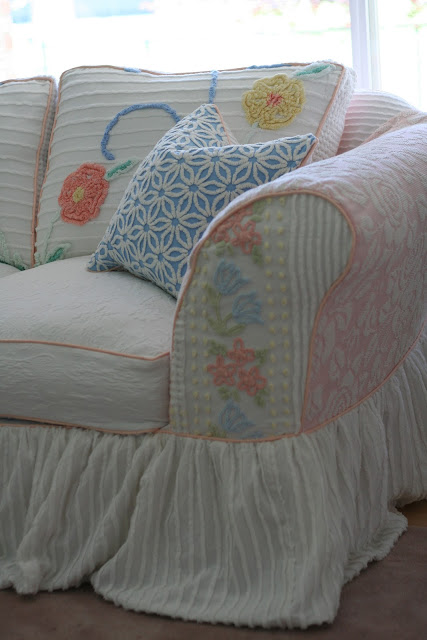
Front of loveseat....she bought inner lining that is used on curtains (feels like flannel) to line most of the bedspreads since some were a little thin. I lined the skirt, front of arms, cushions and pillows. I added 2" to the length of the skirt so it would puddle.

Chair---AFTER--- I used the original bedspread edging for the hem of the skirts on the chair and ottoman....so no lining on these two skirts.

Marcelle had me do the bottoms and the backs of the cushions in different colors, so she can flip them and have another look. The bottom of the chair cushion is out of purple/ white chenille bedspread and the back of the back cushion is out of yellow chenille.


Top of Ottoman. We used the same pink cotton piping everywhere, to tie it all together.


I centered and matched up the designs on the back cushions, so they were symmetrical. The top of the seat cushions and bands are out of a white matelesse.


Centered and matched up back cushions on the second loveseat.


Chair and ottoman---AFTER


Marcelle also hung chenille bedspreads on clip rings for her window treatments.


Front of loveseat arm.


Chair--


I love how her whole room turned out and the vision she had! How Darling is this! She even started switching out her quilts on her quilt rack to coordinate.


I love the minty walls and the chandeliers and the mirror...it all works! I love how slipcovers can change and room!


Side Note #1-- I am booked until End of July/ beginning of August.

Side Note #2--- BASEBALL HAS STARTED!  Life with 3 boys playing baseball has begun. My two oldest are on the same team this year and play two games every Saturday, and my youngest plays one game each Saturday as well.  Here are some pics from the first weeks game.


They were so excited about their uniforms and the fact that their name is on their jerseys.



Photobucket

Thursday, April 19, 2012

Paisley Rocker and Ottoman

This client fell in love with this fabric and hoped we would have enough. There was only 5.5 yds of the paisley, so she bought some solid brown velvet fabric to use as the piping and anywhere else we needed.

The chair before was muslin covered and was meant to be slipcovered.

Chair--AFTER---I don't know how...but we had enough fabric to get the chair and ottoman out of the paisley. I did the decking under the cushion on the chair out of the solid brown. It also helped that we didn't do skirts on either of them.

Front of arm.


The upper back was rounded so I "boxed" it along the top and did piping on both edges.


I also ran piping down the inside arm seam. The paisley chenille fabric shaped and bent really well on all the curves.

SIDE NOTE #1
We headed to St. George and Vegas for Spring break. We hiked at Snow Canyon. The boys loved climbing on all the rocks. On one of the hikes there were pioneer names written on the rocks out of axle grease.

One of my boys asked,  "Why did they write their names on the rock?"....my reply, "Why did you carve your name in the kitchen table?"

Here's a pic of two of my boys.

Top of the hike. Me with the three boys.

The boys were obsessed with trying to catch lizards on our hikes....Here's a pic of them trying to catch one. This pic makes me laugh really hard!

Besides hiking we went to the pool three times a day! The boys love to swim. Perfect spring break!

SIDE NOTE #2

Last time we were at the cabin...the boys made some swings underneath the cabin. They made three....one for each of them. They loved them.


They also made some bunkbeds in their fort at the cabin....pretty cool huh? They still need to finish their fort and get a roof on it.
Photobucket

Thursday, April 12, 2012

My Front Room Redo...Again

OH My....Have my tastes changed a bit in the past few years. I found these old pics on my blog....


BEFORE.....My front room without the slipcovers.


Here was my first look...back in the day when I was loving shabby chic and ruffles.


Here was my second look...I switched out to menswear type slipcovers and exposed the legs. This pic was taken at holiday time...hence the red pillows. I am usually not a red girl.

Notice the blue paint and chair rail that we removed. I also sold my wall tree (coat rack), which just looked junky all the time. Somehow our house doesn't have a hall closet.


My third look...I tried to switch out the ottoman cover and some pillows to freshen and lighten it up....but I was never completely in love. A few weeks ago I went to a clients house and saw her daughters bedroom with horizontal gray and white stripes. OH MY GOSH....it was beautiful. I finally had my inspiration. I was getting lazy just trying to change the fabrics and not repainting the blue and removing the chair rail.

I have learned my lesson! Little updates when I haven't changed the base in 10 years isn't going to make me like it more....I just need to revamp the whole thing and not try to work around things (chair rail/ blue paint).    IF....I just change it all and completely love it, I will be content for years.

MY AFTER and final look! Gray and white with a few pops of green (my favorite color). The green fabric on the pillow, I bought last year when I went to North Carolina to visit Gina from Slipcover Chic.

I found the LARGE mirror at IKEA in the As- is department for $90. I used my Wall Tree proceeds to pay for it. I was hoping it would work and wasn't too big...luckily I was right, because you can't return As-is items.


I brought in a dresser from the garage that was holding the boys baseball gloves and bats. It had paint splattered across the front of the drawers. I took some sand paper and sanded it off and then wiped some furniture oil over it. 10 min. job...and it turned out great.

With all the straight lines on the wall and chevron pillows, I felt the white chairs need some scrolly type fabric on the pillows. Made up these white and gray pillows with no piping (knife edge).

I switched my bedroom curtains with the front room curtains...the white worked better in here.


I also spray painted the legs on all the furniture white. The legs seemed to disappear into the slipcovers....I wanted them to POP!


I switched out my ottoman for a large rustic trunk that I had up in my bonus room. I got this for babysitting when I was 16. The lady I baby sat for volunteered at the local thrift store. I saw it in her garage and told her how much I liked it....next time I babysat she gave it to me as payment.


I picked up the green matelesse throw blanket at a thrift store about 6 months ago. I bought it because of the color and figured I could cut it up and make something out of it.....NOPE, I kept it just as is.

I also swiped the lamp from downstairs and put a barrel shade on it.

I am learning the art of accessorizing....last week I headed to Hobby Lobby with an old college friend that was in town. I threw anything that I liked in my cart, and decided I could return anything that didn't work. I was loving the metal industrial type stuff, and rustic items, and of course silver and green.


On my drive home from Hobby Lobby, I texted my running partner, Camille to come help me accessorize. I am still not very good at the small things. I know what I like, but pulling it together is sometimes difficult. The dresser accessories are my FAVORITE!!! I got everything for 50% off. The metal items went on sale this week, so I went back and got a price adjustment. (If items go on sale the next week, you can take them back with your receipt and get the difference back).


Close up of my trunk, my brother Clark tried to steal this from me when he left to college. He threw all his belongings in it and tossed it in the back of his pickup truck when he left. To make me feel better, he told me when I got married and wanted it back, he'd return it. 5 yrs later, I came collecting. His wife was sad to see it go.


So all in all, I spent  $150 on paint and paint supplies, and $100 on accessories. Everything else I already had in other areas of the house...HOORAY for "in house shopping". Heber was a champ and did 75% of the painting. We used a laser line to tape off the stripes.


Photobucket

Thursday, April 5, 2012

Ladies and Gentleman Damask Wingbacks

My client had this pair of red checked chair....a gentleman's (larger framed) and a ladies chair. She was ready for a a change.


Ladies chair--- BEFORE


Gentleman's chair--- BEFORE----check out those HUGE "telephone" arms. At least that's what I call them...they look like the old school phones.


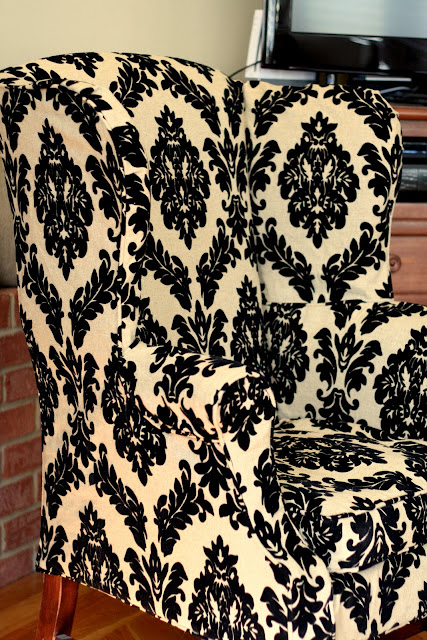
AFTER---- She chose a stunning tan linen fabric that had a black flocked velvet damask print on it.


Gentleman's Chair--- AFTER


Ladies chair--- AFTER


Close up of "telephone" arms


I did the sides on the outside all in one piece, so I wouldn't have to match up the pattern from the outside wing to the under arm. I had to put pins above the repeat for placement, because I couldn't see the pattern from the wrong side of the fabric. SO I had to go off my pins and hope it all worked out.


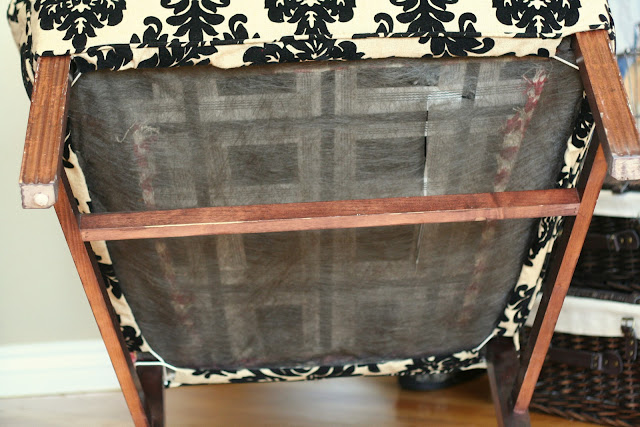
I sewed a 1.5" casing around the bottom edge, and then fed a rope through pulled it tight and tied it to the back leg. This is a great solution to help keep the slipcover tight and in place....but time consuming if you have to refeed the rope through if you are going to be washing often..... These will be dry clean only, with the velvet flocking, so it was a great option for these.


Close up of casing....with a couch... you'd do two casings on the front and back sides a few inches apart, so you can figure 8 the rope through. My client showed me this casing idea off another slipcover she had made in Virginia....I loved it!


I loved the transformation in the room!!!

Photobucket